Autopatch, which is available for public review since April, as it will become generally available very soon.*
*According to Microsoft, Windows Autopatch will launch in July 2022
It’s worth getting educated about this new feature of Microsoft Endpoint Manager and its potential impacts on you as an IT admin will be.
What is Windows Autopatch
Windows Autopatch is a cloud service that automatically manages Windows, Microsoft 365 Apps for enterprise, Microsoft Edge, and Microsoft Teams updates for enterprises in order to improve security and productivity in organizations.
Windows Autopatch is aiming to make life of IT admins easier so they can focus on the tasks that matter, taking over patching Microsoft products. Along with this, Microsoft Autopatch solves other challenges, that IT departments face today:
- it closes security gap – keeping software up to date protects endpoints from CVEs;
- it closes productivity gap
- it optimizes IT admin resources – by automating updates, IT admins can create more value in other areas
- forces the implementation of Modern device management
- minimizes end-user disruption – by releasing update rings, user disruptions are minimized.
“The takeaway if you’re an IT admin? You can continue using the tools and processes you’re accustomed to for managing and deploying updates—or you can take a hands-off approach and let Windows Autopatch do it for you,” said Lior Bela, a Sr. Product Marketing Manager at Microsoft.
This service is responsible to take control of:
- Windows quality updates – Windows Autopatch aims for at least 95% of eligible devices to be patched in 21 days of release.
- Microsoft 365 apps for enterprise – Aims to keep at least 90% of eligible devices on supported version of Monthly Enterprise Channel
- Microsoft Edge – Progressive rollout of Microsoft edge for eligible devices
- Microsoft Teams – To benefit from standard automatic update channel
Prepare your endpoints for Windows Autopatch
To get started with Windows Autopatch, make sure that you meet the infrastructure requirements.
Licensing:
- Microsoft 365 E3
- Microsoft 365 E5
- Windows 10/11 Enterprise E3
- Windows 10/11 Enterprise E5
- Windows 10/11 Enterprise VDA.
Additionally, Azure Active Directory Premium and Microsoft Intune are required.
Supported operating systems:
- Windows 10/11 Pro
- Windows 10/11 Enterprise
- Windows 10/11 Pro for Workstations
Device management:
- Devices must be corporate-owned – Windows Autopatch doesn’t support BYOD devices
- Devices must be managed by either Intune or Configuration Manager Co-management
- Devices must be in communication with Microsoft Intune in the last 28 days
- Devices must be connected to the Internet.
- Devices must have a Serial number, Model and Manufacturer.
If you’re on-prem (SCCM)…
If you are using ConfigMgr, you can’t use Windows Autopatch ☹. Co-management is a solution ?
Intune must be set as the Mobile Device Management (MDM) authority or co-management must be turned on and enabled on the target devices.
Setup & device regististration
Tenant onboarding
To enroll your tenant, you must use one of the following built-in roles:
- Azure AD Global Administrator
- Intune Service Administrator
- Modern Workplace Intune Administrator
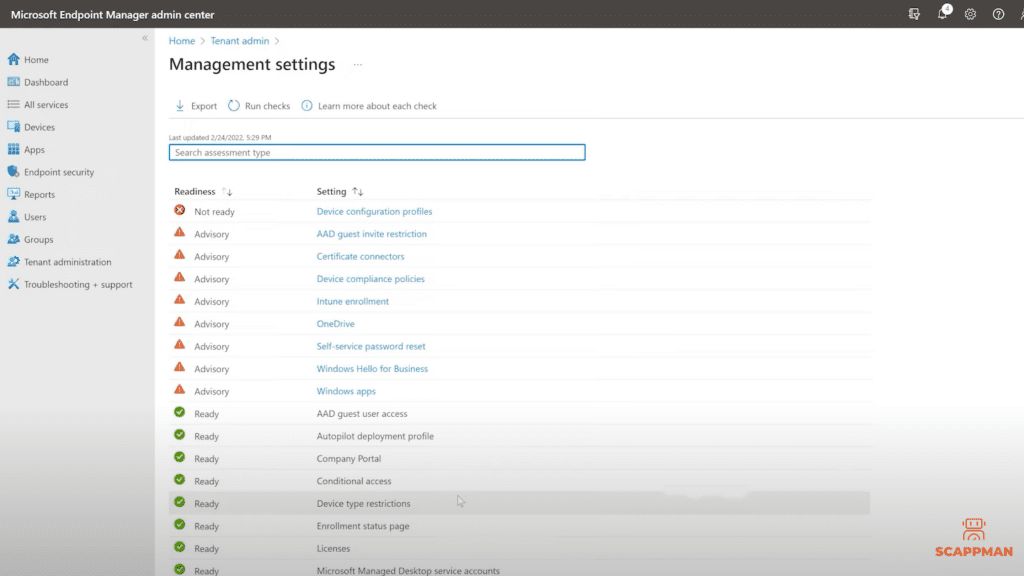
To enroll your tenant to Windows Autopatch, log in to Microsoft Endpoint Manager admin center, go to Tenant administration > Tenant enrollment (under Windows Autopatch) and hit Run management check to check if your Intune devices are ready to enroll.

Once the assessment is done, the Readiness assessment tool will report one of four possible results:
- Ready – no action required before enrollment
- Advisory – you can enroll your tenant but there are some issues that must be fixed before deploying the first device
- Not ready – enrollment will fail if you don’t fix these issues
- Error – you’re using the Azure AD role, which doesn’t have permissions to enroll the tenant.
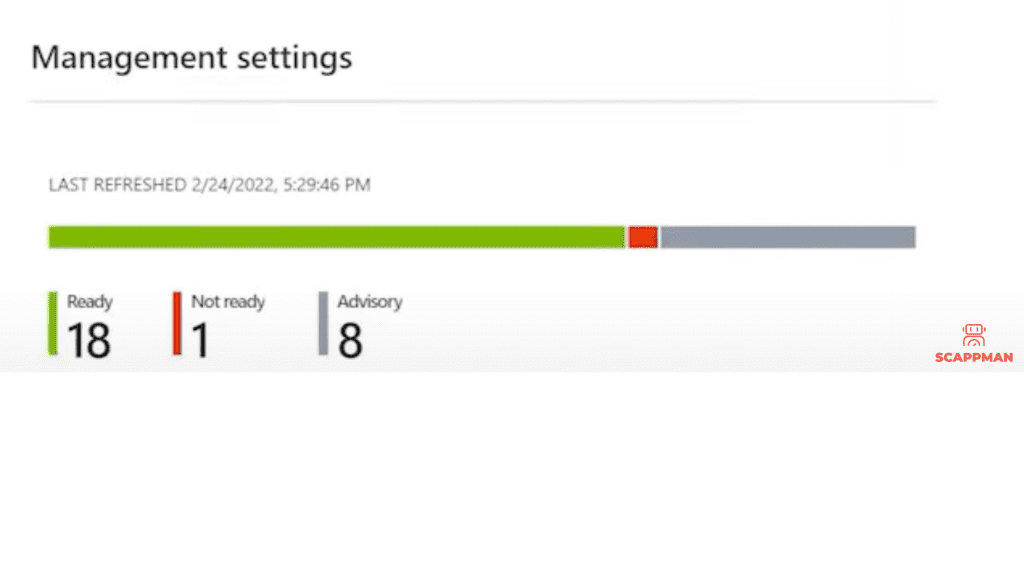
For Advisory and Not ready settings, Microsoft provides you with steps that you have to follow to fix the issues.
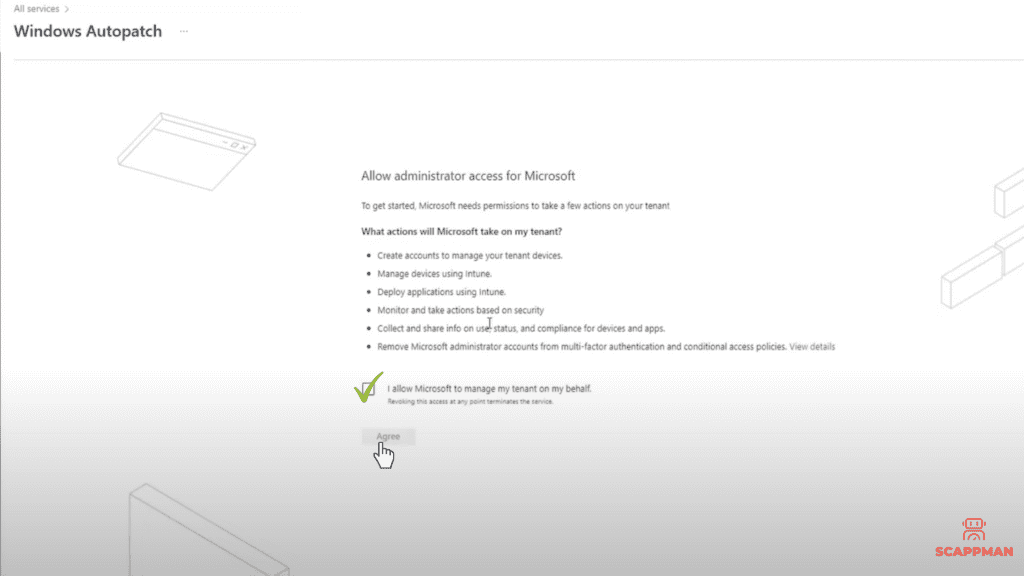
Once done with Readiness, you can enroll your tenant by pressing Enroll. This will take some time as this will create new Azure AD security groups and policies.
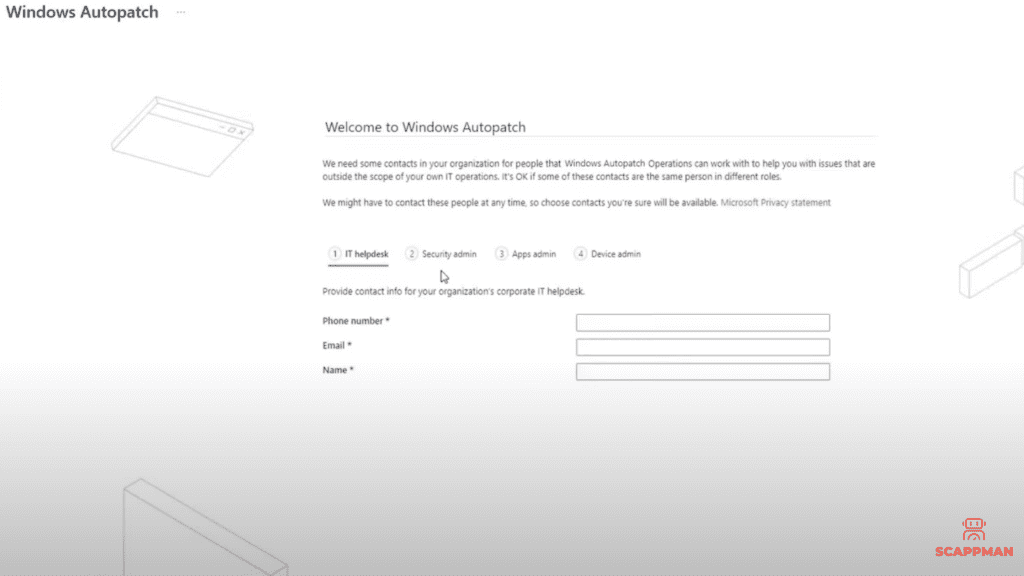
Afterward, you need to provide Windows Autopatch with administrator access and fill in some information, like your phone number, email, name and preferred language. Click Complete.
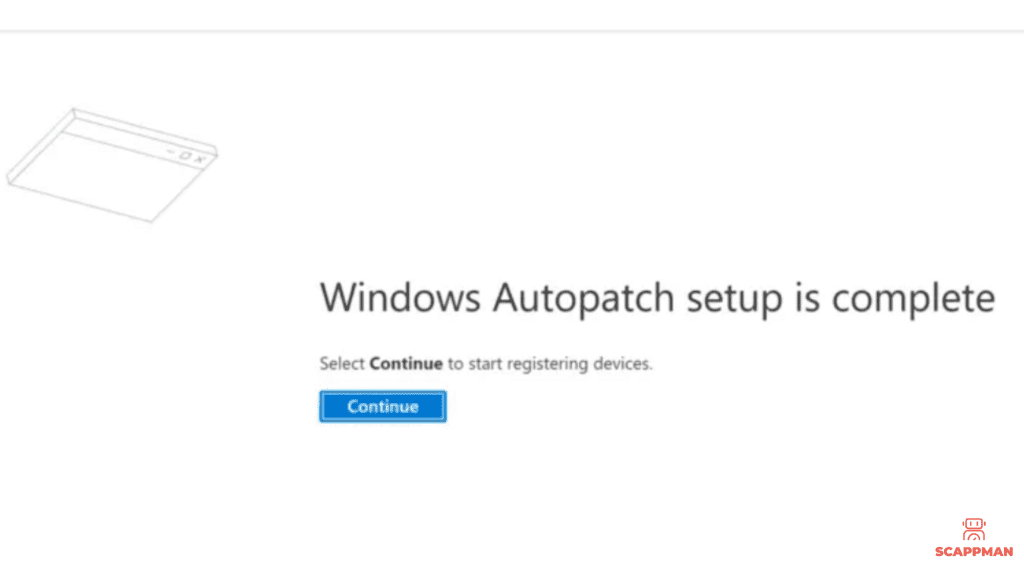
When the setup is complete you will see the notification. Now you can register devices.
Onboarding devices to Windows Autopatch
Go to Devices and under Windows Autopatch click on Devices. To register the device, click on Windows Autopatch Device Registration hyperlink.
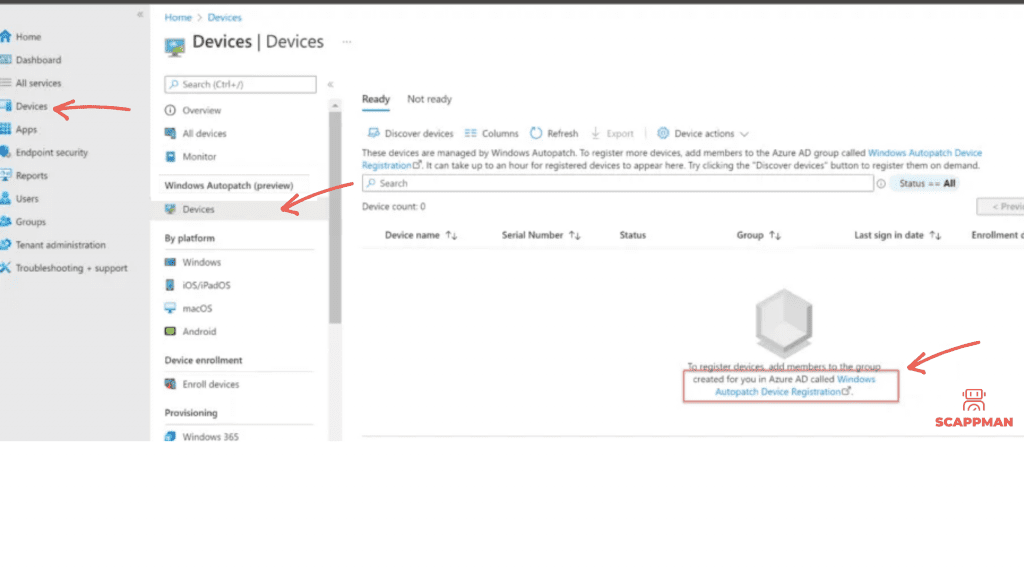
The Azure Active Directory group blade opens. Add either devices through direct membership, or other Azure Active Directory dynamic or assigned groups as nested groups in the Windows Autopatch Device Registration group. Once devices or Azure AD groups containing devices are added to the Windows Autopatch Device Registration group, Windows Autopatch discovers these devices and runs software-based prerequisite checks to try to register them with its service.
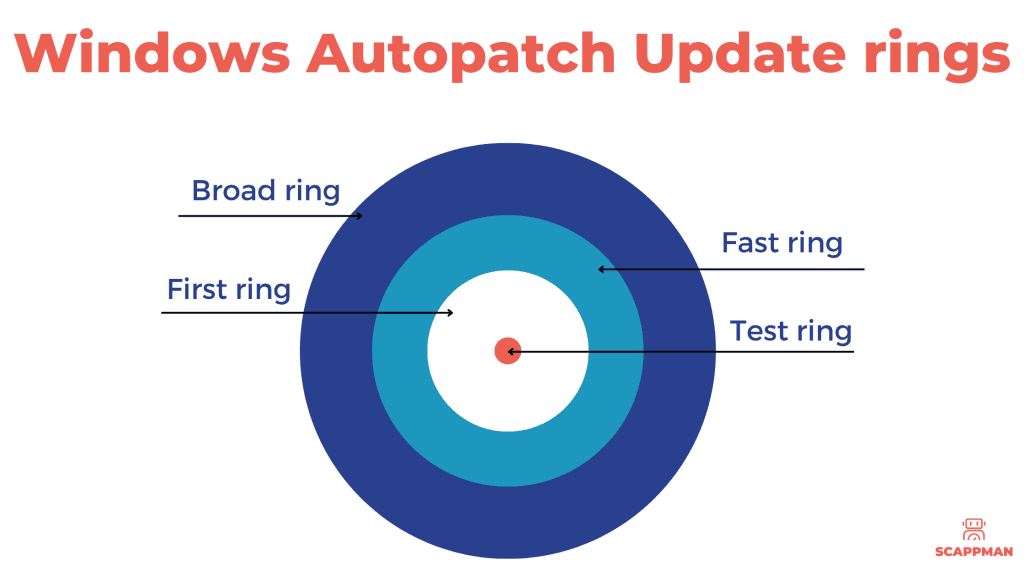
Windows Update Rings in Windows Autopatch
Now it’s getting interesting. You need to assign devices to Update Rings created by Windows Autopatch:
- Modern Workplace Devices – Test
- Modern Workplace Devices – First
- Modern Workplace Devices – Fast
- Modern Workplace Devices – Broad
Each of the update rings has a specific objective and has assigned a set of policies to control the rollout of updates in each management area.
| Ring | Device count | Description |
| Test | Windows Autopatch doesn’t automatically add devices to this ring. You must manually add devices to the Test ring. The recommended number of devices in this ring, based upon your environment size, is as follows: – 0–500 devices: minimum one device – 500–5000 devices: minimum five devices – 5000+ devices: min 50 devices Devices in this group are intended for your IT Administrators and testers since changes are released here first. This release schedule provides your organization the opportunity to validate updates prior to reaching production users. | |
| First | 1% | The First ring is the first group of production users to receive a change. This group is the first set of devices to send data to Windows Autopatch and are used to generate a health signal across all customers. For example, we can generate a statistically significant signal saying that critical errors are trending up in a specific release for all customers but can’t be confident that it’s doing so in your environment. Since Windows Autopatch doesn’t yet have sufficient data to inform a release decision, devices in this ring might experience outages if there are scenarios that weren’t covered during testing in the Test ring. |
| Fast | 9% | The Fast ring is the second group of production users to receive changes. The signals from the First ring are considered as a part of the release process to the Broad ring. The goal with this ring is to cross the 500-device threshold needed to generate statistically significant analysis at the tenant level. These extra devices allow Windows Autopatch to consider the effect of a release on the rest of your devices and evaluate if a targeted action for your tenant is needed. |
| Broad | 90% | The Broad ring is the last group of users to receive changes. Since it contains most of the devices enrolled in Windows Autopatch, it favors stability over speed in deployment. |
Advantages and disadvantages of Windows Autopatch
Windows Autopatch Pros:
+ The ability to use ring deployment to manage your Windows environment
+ The burden of patching Windows and some Microsoft products is on Windows Autopatch now instead of IT admins, so they focus on other tasks
+ Requires Intune or Co-management (it’s good news if you’re on-prem ?)
Windows Autopatch Cons:
– The feature is only useful for Windows 10 and 11 device management: Windows Autopatch doesn’t support Windows server, devices on macOS and Linux
– No third-party patching!
Despite that introducing Windows Autopatch, Microsoft eases off the pressure on IT admins by automating the patch management of Windows OS and Microsoft products, IT admins still must take care of pathing third-party applications.
Automated third-party patching with Scappman
Windows Autopatch and Scappman are a perfect combination, that you must use for your patch management strategy. While Windows Autopatch takes care of Windows OS, Scappman will patch all your applications automatically.
Scappman is a 100%-cloud solution that automatically installs all the necessary updates for your applications. Scappman automates the whole process of uploading the application and updating it in Microsoft Intune environment. There are more than 600 third-party applications in Scappman App Store, which are always up to date and secure to use. We’ll make sure that hackers can’t use vulnerabilities in outdated applications to steal or encrypt your data.
Scappman scraps the installed applications for the new version and if it’s available, Scappman tests it, wraps the application installation file into .intunewin and uploads it to Intune and installs it to the assigned users. It’s that straight forward.